
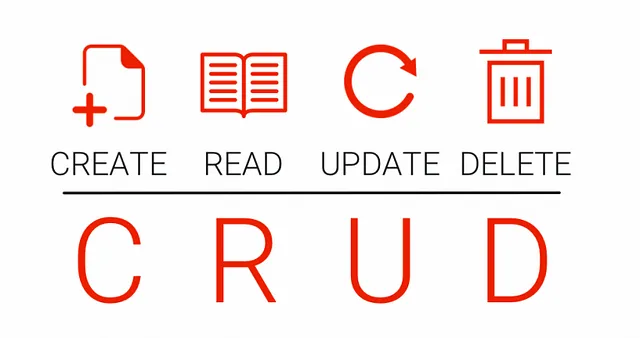
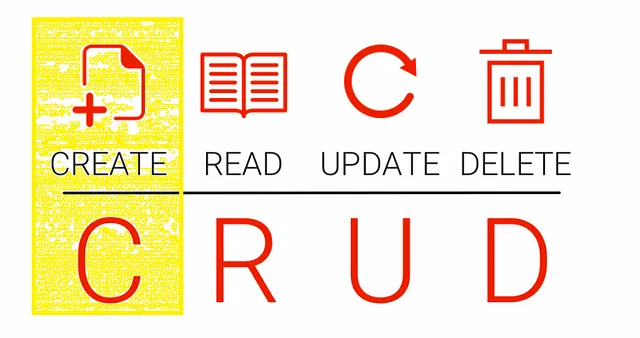
This is a complete tutorial for beginners on how to develop a Java web application using Spring MVC, Hibernate, Spring Data JPA, and Java Servlet JSP from scratch. This tutorial will help you understand basic concepts, configurations, tools required, and coding to execute a simple Login page with Create, Read, Update, and Delete User detail functionalities (CRUD operation).
This article can be divided mainly into 3 sections:
- One, Tools setup
- Two, Coding + concepts (Read operation)
- Three, Coding + concepts (Create, Update, and Delete operation), you are here 😊
Continue if you’ve gone through the environment setup and are ready to code. If not, click on the link below 😊
Java web application using Spring framework? Part 2/3 (Coding)
Now let us do the Creation flow (Adding a new user to login). 😃
This section will help you learn how to save details to a database.
1: In index.jsp, add the following snippet after the submit button.
<a href="other">Click to perform other operations</a>2. In the CustomerController class, add the following method.
@RequestMapping(value = "/other")
public ModelAndView performOtherOperations() {
     ModelAndView modelAndView = new ModelAndView("operations");
     return modelAndView;
}
Here, it comes to the handler and looks up for ‘/other’ and if found, executes it, which redirects to operations.jsp page.
3. Create operations.jsp inside ‘views’ and place the below code in it.
<%@ page language="java" contentType="text/html; charset=ISO-8859-1" pageEncoding="ISO-8859-1"%>
<%@ taglib uri="http://java.sun.com/jsp/jstl/core" prefix="c" %>
<!DOCTYPE html PUBLIC "-//W3C//DTD HTML 4.01 Transitional//EN" "http://www.w3.org/TR/html4/loose.dtd">
<html>
<head>
<meta http-equiv="Content-Type" content="text/html; charset=ISO-8859-1">
<link href="//maxcdn.bootstrapcdn.com/bootstrap/4.1.1/css/bootstrap.min.css" rel="stylesheet" id="bootstrap-css">
<title>Customer</title>
<%@ page isELIgnored="false" %>
<link href="resources/css/table.css" rel="stylesheet" media="screen">
</head>
<body>
<div align="center">
<br>
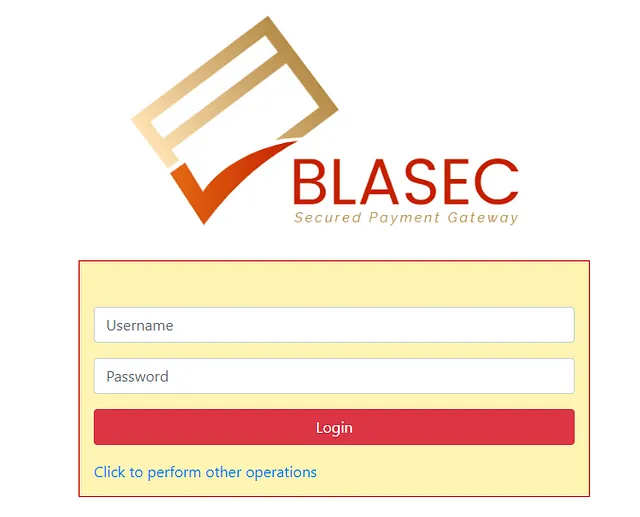
<h5><img alt="BlaSec Logo" src="resources/images/logo.png" width="300"></h5>
<br>
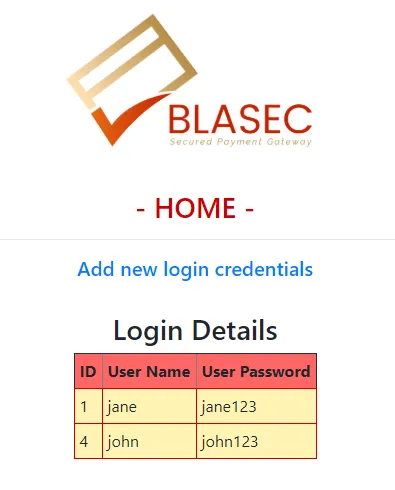
<h3 style="color: #cc0000;">- HOME -</h3>
<hr>
<h5><a href="add">Add new login credentials</a></h5>
<br>
</div>
</body>
</html>Here, it says to look up for ‘/add’ in the handler and execute it when ‘Add new login credentials’ is clicked.
4. In the CustomerController class, add the following method.
@RequestMapping(value = "/add")
public ModelAndView addUser() {
   ModelAndView modelAndView  = new ModelAndView("newuser");
   Logindetails logindetails = new Logindetails();
   modelAndView.addObject("logindetails", logindetails);
   return modelAndView;
}
Here, it looks up for ‘/add’ in the handler and executes it. We are redirecting to a newuser.jsp page where the user can input a new username and password to save. To get the values inputted, we also pass an object logindetails entity to store the username and password in it.
5. Create newuser.jsp inside ‘views’ and place the below code in it.
<%@ page language="java" contentType="text/html; charset=ISO-8859-1" pageEncoding="ISO-8859-1"%>
<%@ taglib prefix="form" uri="http://www.springframework.org/tags/form"%>
<!DOCTYPE html PUBLIC "-//W3C//DTD HTML 4.01 Transitional//EN" "http://www.w3.org/TR/html4/loose.dtd">
<html>
<head>
<meta http-equiv="Content-Type" content="text/html; charset=ISO-8859-1">
<link href="//maxcdn.bootstrapcdn.com/bootstrap/4.1.1/css/bootstrap.min.css" rel="stylesheet" id="bootstrap-css">
<title>Customer</title>
</head>
<body>
<div align="center">
<br>
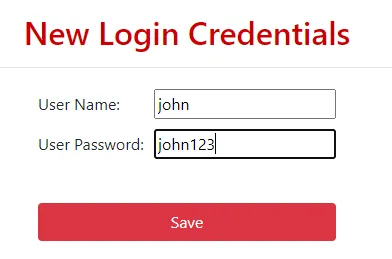
<h2 style="color: #cc0000;">New Login Credentials</h2>
<hr>
<form:form action="save" method="post" modelAttribute="logindetails">
<table border="0" cellpadding="5">
<tr>
<td>User Name: </td>
<td><form:input path="username" /></td>
</tr>
<tr>
<td>User Password: </td>
<td><form:input path="userpassword" /></td>
</tr>
<tr>
<td> <br> </td>
</tr>
<tr>
<td colspan="2"><input type="submit" value="Save" class="btn btn-danger btn-block"></td>
</tr>
</table>
</form:form>
</div>
</body>
</html>Here, it says to look up ‘/save’ in the handler and execute it when ‘Save’ is clicked. Remember to use the same name as of logindetails entity fields in corresponding paths. With the help of ‘modelAttribute=”logindetails”’, values are stored in the entity we passed.
6. In the CustomerController class, add the following method.
@RequestMapping(value = "/save", method = RequestMethod.POST)
public String saveLoginDetails(@ModelAttribute("logindetails") Logindetails logindetails) {
    customerService.save(logindetails);
    return "redirect:/other";
}
Here, it looks up for ‘/save’ in the handler and executes it. We save ‘logindetails’ we got to the database. For saving,
7. In the CustomerService class, add the following method.
public void save(Logindetails logindetails);8. In the CustomerServiceImpl class, add the following method.
public void save(Logindetails logindetails) {
     loginRepository.save(logindetails);
}
That’s it. 😃. SAVED!!!
Remember we haven’t mentioned an ID for this entry🤔
So basically what happens here is, that it will automatically generate an ID and together it will save values to the table in the database with the help of the in-built method save(). Here, JPA comes into the picture by creating an insert query for us in the background thus reducing our effort. Also since this operation is part of our @Transactional, the commit happens at the end too. 😀
Now let’s Maven Update, Clean, and Install the project and start our server.
Don’t forget to run your MySQL service too. (Ignore if it’s in running status)

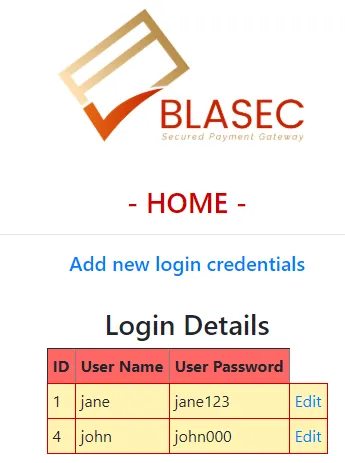
Thus, we come to an end of CREATE operation 😊
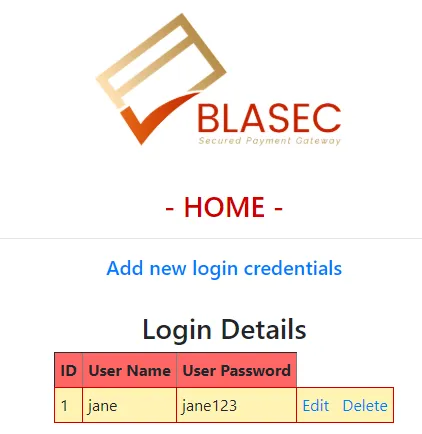
Now let us do an Update flow (Editing an existing user). 😃
This section will help you learn how to edit and save existing users to the database.
To perform this, we will first display all login details on our screen.
1. In operations.jsp, add the following method after the last <br> tag.
<h3>Login Details</h3>
<table border="1" cellpadding="5" id="index">
<tr>
<th>ID</th>
<th>User Name</th>
<th>User Password</th>
</tr>
<c:forEach items="${loginDetails}" var="loginDetails">
<tr>
<td>${loginDetails.id}</td>
<td>${loginDetails.username}</td>
<td>${loginDetails.userpassword}</td>
</tr>
</c:forEach>
</table>
<br>
To make the table more attractive, create table.css in resources -> css and place the below code in it.
tr {
background-color: #fff4b3;
}td {
border: 1px solid #cc0000;
}th {
background-color: #ff6666;
}#index {
border-collapse: collapse;
}tr:hover {
background-color: #ddd;
}
2. Replace existing method in CustomerController class having ‘/other’ request i.e., performOtherOperations().
List<Logindetails> loginDetails =
customerService.listAllLoginDetails();
ModelAndView modelAndView = new ModelAndView("operations");
modelAndView.addObject("loginDetails", loginDetails);
return modelAndView;
3. In the CustomerService class, add the following method.
public List<Logindetails> listAllLoginDetails();4. In the CustomerServiceImpl class, add the following method.
public List<Logindetails> listAllLoginDetails() {
    return (List<Logindetails>) loginRepository.findAll();
}
That’s it. 😃. READ!!!
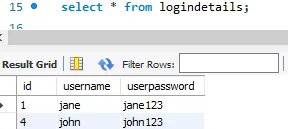
So basically what happens here is, it fetches all entries from logindetails table with the help of the in-built method findAll(). Here, JPA comes into the picture by creating a select * query for us in the background thus reducing our effort.😀
Now let’s Maven Update, Clean, and Install the project and start our server.
Don’t forget to run your MySQL service too. (Ignore if it’s in running status)
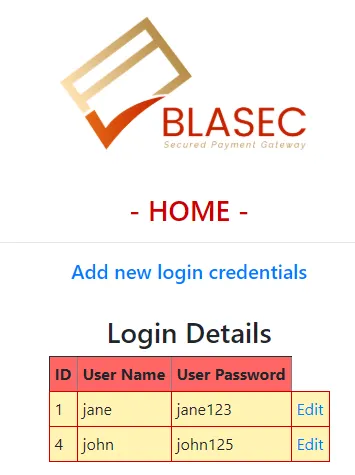
5. Add the following snippet in operations.jsp after <td>${loginDetails.userpassword}</td>
<td>
     <a href="edit?id=${loginDetails.id}">Edit</a>
</td>
6. In the CustomerController class, add the following method.
@RequestMapping("/edit")
public ModelAndView editLoginDetails(@RequestParam long id) {
    ModelAndView modelAndView = new ModelAndView("user_edit");
    Logindetails logindetails = customerService.get(id);
    modelAndView.addObject("logindetails", logindetails);
    return modelAndView;
}
First, logindetails are fetched from the table using the in-built get() method. The parameter should be the table’s primary key, which is the ID here. Then we pass logindetails as an object to user_edit.jsp page.
7. Create user_edit.jsp inside ‘views’ and place the below code in it.
<%@ page language="java" contentType="text/html; charset=ISO-8859-1" pageEncoding="ISO-8859-1"%>
<%@ taglib prefix="form" uri="http://www.springframework.org/tags/form"%>
<!DOCTYPE html PUBLIC "-//W3C//DTD HTML 4.01 Transitional//EN" "http://www.w3.org/TR/html4/loose.dtd">
<html>
<head>
<meta http-equiv="Content-Type" content="text/html; charset=ISO-8859-1">
<link href="//maxcdn.bootstrapcdn.com/bootstrap/4.1.1/css/bootstrap.min.css" rel="stylesheet" id="bootstrap-css">
<title>Customer</title>
<%@ page isELIgnored="false" %>
</head>
<body>
<div align="center">
<br>
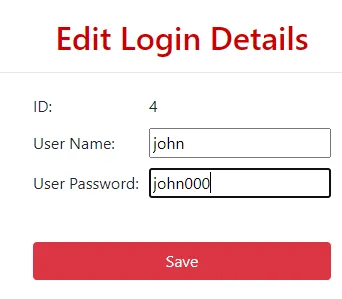
<h2 style="color: #cc0000;">Edit Login Details</h2>
<hr>
<form:form action="save" method="post" modelAttribute="logindetails">
<table border="0" cellpadding="5">
<tr>
<td>ID: </td>
<td>${logindetails.id}
<form:hidden path="id"/>
</td>
</tr>
<tr>
<td>User Name: </td>
<td><form:input path="username" /></td>
</tr>
<tr>
<td>User Password: </td>
<td><form:input path="userpassword" /></td>
</tr>
<tr>
<td> <br> </td>
</tr>
<tr>
<td colspan="2"><input type="submit" value="Save" class="btn btn-danger btn-block"></td>
</tr>
</table>
</form:form>
</div>
</body>
</html>8. In the CustomerService class, add the following method.
public Logindetails get(Long id);9. In the CustomerServiceImpl class, add the following method.
public Logindetails get(Long id) {
     return loginRepository.findById(id).get();
}
So basically what happens here is, it fetches entries from logindetails table based on the ID with the help of the in-built method get(). Here, JPA comes into the picture by creating a select * query with a where condition for us in the background thus reducing our effort.😀
Now let’s Maven Update, Clean, and Install the project and start our server.
Don’t forget to run your MySQL service too. (Ignore if it’s in running status)
Thus, we come to an end of the UPDATE operation 😊

Now let us do the Delete flow (Deleting an existing user). 😃
This section will help you learn how to delete an existing user from the database.
1. Append the following snippet in operations.jsp after <a href=”edit?id=${loginDetails.id}”>Edit</a>
<a href="delete?id=${loginDetails.id}">Delete</a>2. In the CustomerController class, add the following method.
@RequestMapping("/delete")
public String deleteLoginDetails(@RequestParam long id) {
    customerService.delete(id);
    return "redirect:/other";
}
3. In the CustomerService class, add the following method.
public void delete(Long id);4. In the CustomerServiceImpl class, add the following method.
public void delete(Long id) {
    loginRepository.deleteById(id);
}
So basically what happens here is, it deletes an entry from logindetails table by ID with the help of the in-built method deleteById(). Here, JPA comes into picture by creating a delete query with where condition for us in the background thus reducing our effort.😀
Now let’s Maven Update, Clean, and Install the project and start our server.
Don’t forget to run your MySQL service too. (Ignore if it’s in running status)
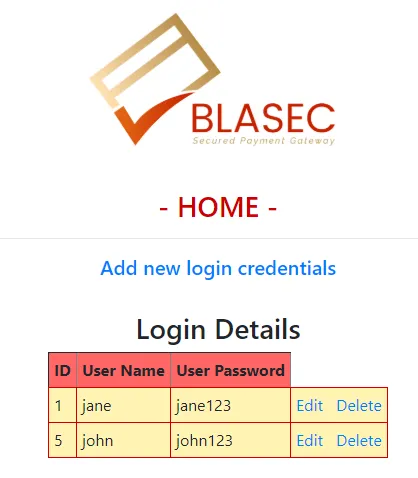
Thus, we come to an end of DELETE operation 😊

Thank you for reading! I hope you’re able to understand and proceed with development with this explanation and please share to help others too. 😊
Well, there are a lot of areas for improvement in this project and, for any new suggestions or comments, I’m all ears.
Download project from: https://github.com/sharuroy16/customer
Project developed using this methodology: https://github.com/sharuroy16/blasec
ufocTWE PYOgpYDM awpIMICx