
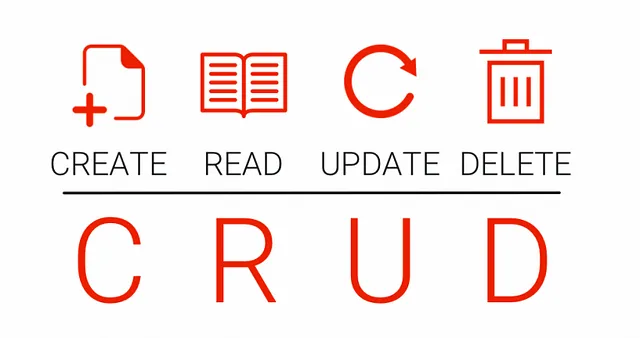
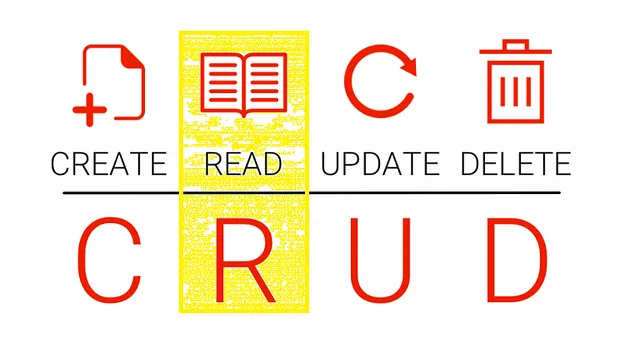
This is a complete tutorial for beginners on how to develop a Java web application using Spring MVC, Hibernate, Spring Data JPA, and Java Servlet JSP from scratch. This tutorial will help you understand basic concepts, configurations, tools required, and coding to execute a simple Login page with Create, Read, Update, and Delete User detail functionalities (CRUD operation).
This article can be divided mainly into 3 sections:
- One, Tools setup
- Two, Coding + concepts (Read operation), you are here 😊
- Three, Coding + concepts (Create, Update, and Delete operation)
Continue if you’ve gone through the environment setup and are ready to code. If not, click on the link below 😊
How to build a Java web application using Spring framework? Part 1/3 (Tools Installation)
What is the Spring framework?

Spring is an open-source framework created to address the complexity of enterprise application development. It also allows a developer to be selective about which of its components they can use while providing a cohesive framework for J2EE application development. It was designed to simplify Java EE development and make developers more productive. Spring makes use of Inversion of Control(IOC) and Dependency Injection to promote good software coding practices and speed up development time. It is a powerful and lightweight framework.
Different Spring frameworks are Spring Core, Spring AOP, Spring Web MVC, Spring DAO, Spring ORM, Spring Context, and Spring Web Flow. These modules provide different platforms to develop different enterprise applications; for example, you can use the Spring Web MVC module for developing MVC-based applications.
Model-View-Controller (MVC) is a well-known design pattern for designing GUI-based applications. It mainly decouples the business logic from UI by separating the roles of Model, View, and Controller in an application.
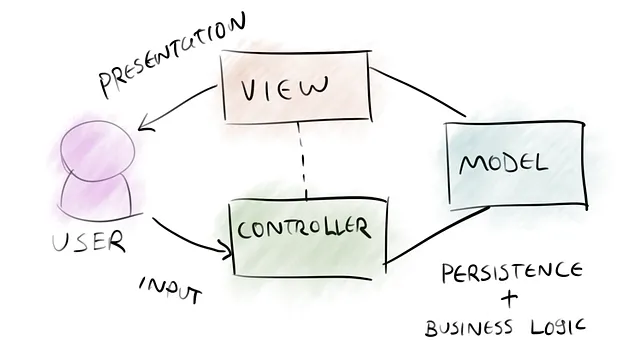
Model (M): The Model’s responsibility is to manage the application’s data, business logic, and business rules. It is a POJO class that encapsulates the application data given by the controller.
View (V): A view is an output representation of the information, such as displaying information or reports to the user either as a text form or as charts. Views are usually JSP templates written with *Java Standard Tag Library (JSTL).
Controller (C): The Controller’s responsibility is to invoke the Models to perform business logic and then update the view based on the model’s output. In the spring framework, the controller part is played by the Dispatcher Servlet.
What is the Hibernate framework?

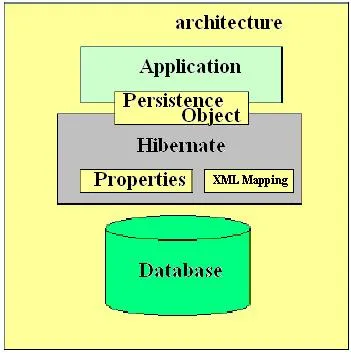
Hibernate is the Opensource lightweight ORM (Object Relational Mapping) based framework to communicate with the database. ORM is a programming technique that maps objects to the data stored in the database. Hibernate framework enables the development of Java applications to interact with the database in a simple manner and it handles mapping of Java classes to database tables. It also provides data query and retrieval facilities and is purely used for data persistence (i.e. to store/retrieve data from the database).
What is JPA?
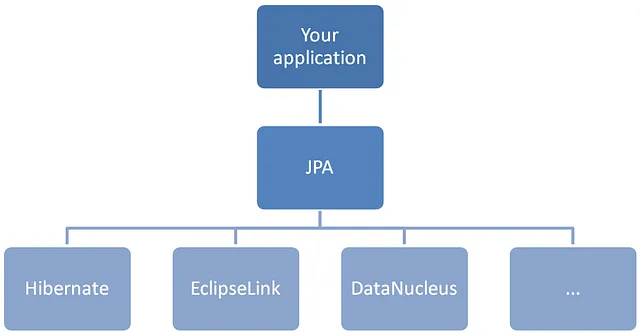
The Java Persistence API (JPA) is a specification of Java. It is used to persist data between Java objects and relational databases. JPA acts as a bridge between object-oriented models(Java programs) and relational database systems. ORM tools like Hibernate implement JPA specifications for data persistence. To reduce the burden of writing codes for relational object management, a programmer follows the JPA framework, which allows easy interaction with database instances.
Now let us start. 😃
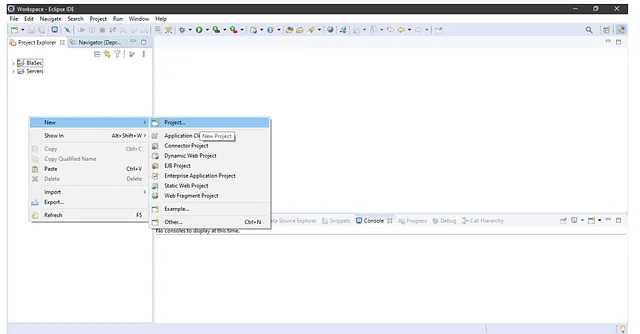
1: Open Eclipse and follow the below steps.
Why Maven?
Maven is a powerful project management tool that is based on POM (Project Object Model). It simplifies the build process like ANT. Maven can add all the dependencies required for the project automatically by reading the Pom file. One can easily build their project to jar, war, etc.

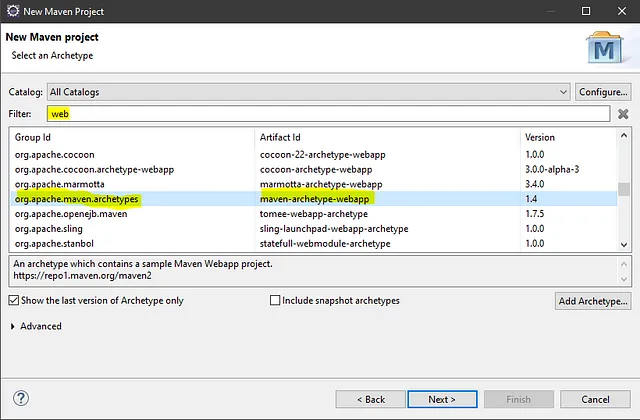
What and Why?
A Maven archetype is an abstraction of a kind of project that can be instantiated into your project. It is a template. ‘maven-archetype-webapp’ is an archetype that generates a sample Maven web app project. To create a simple Java web application, we need ‘maven-archetype-webapp’ plugin.
Why?
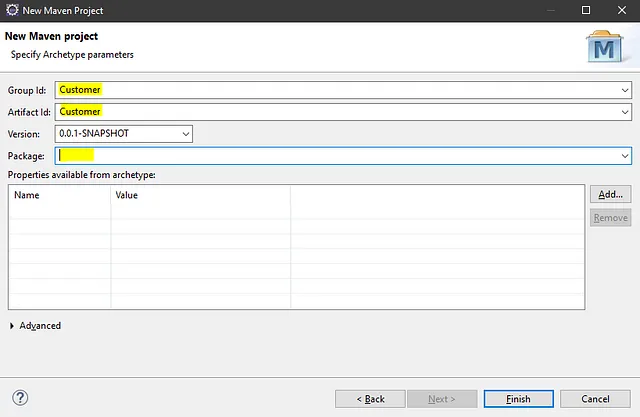
Maven uses a set of identifiers to uniquely identify a project.
groupId — a unique base name of the company or group that created the project. A group ID should follow Java’s package name rules.
artifactId — is the name of the jar without version.
For example,
Package name: com.mycompany.samplecustomerprojectgroupId: com.mycompany.samplecustomerprojectartifactId: sample-customer-projectIf I were searching for a customer project in the Maven repo, I would look for sample-customer-project-x.y.jar in com.mycompany.samplecustomerproject group directory and will find it there according to the convention.
2. Edit pom.xml file.
Copy and paste the below code in the pom.xml. The explanation for each dependency is mentioned in the file.
<?xml version="1.0" encoding="UTF-8"?>
<project xmlns="http://maven.apache.org/POM/4.0.0" xmlns:xsi="http://www.w3.org/2001/XMLSchema-instance" xsi:schemaLocation="http://maven.apache.org/POM/4.0.0 http://maven.apache.org/xsd/maven-4.0.0.xsd">
<modelVersion>4.0.0</modelVersion>
<groupId>Customer</groupId>
<artifactId>Customer</artifactId>
<version>0.0.1-SNAPSHOT</version>
<packaging>war</packaging>
<name>Customer</name>
<description>A sample java web application using Spring MVC, Hibernate, Spring Data JPA and Java Servlet JSP to execute a simple Login page - CRUD operation.</description>
<!-- Declare properties for the version of Spring and Hibernate frameworks. We will be using below version -->
<properties>
<spring.version>5.1.5.RELEASE</spring.version>
<hibernate.version>5.4.1.Final</hibernate.version>
</properties>
<dependencies>
<!-- Specify following dependency for Spring framework --><dependency>
    <groupId>org.springframework</groupId>
    <artifactId>spring-context</artifactId>
    <version>${spring.version}</version>
</dependency>
<!-- For web development with Spring MVC -->
<dependency>
    <groupId>org.springframework</groupId>
    <artifactId>spring-webmvc</artifactId>
    <version>${spring.version}</version>
</dependency>
<!-- To use Spring Data JPA, we need to specify following dependencies -->
<dependency>
   <groupId>org.springframework</groupId>
   <artifactId>spring-orm</artifactId>
   <version>${spring.version}</version>
</dependency>
<dependency>
   <groupId>org.springframework.data</groupId>
   <artifactId>spring-data-jpa</artifactId>
   <version>2.1.5.RELEASE</version>
</dependency>
<!-- We use Hibernate as a provider of JPA -->
<dependency>
   <groupId>org.hibernate</groupId>
   <artifactId>hibernate-core</artifactId>
   <version>${hibernate.version}</version>
</dependency>
<!-- To let the application work with MySQL database, we need to have the dependency for MySQL JDBC driver -->
<dependency>
   <groupId>mysql</groupId>
   <artifactId>mysql-connector-java</artifactId>
   <version>8.0.14</version>
   <scope>runtime</scope>
</dependency>
<!-- For Java Servlet, JSP and JSTL -->
<dependency>
   <groupId>javax.servlet</groupId>
   <artifactId>javax.servlet-api</artifactId>
   <version>3.1.0</version>
   <scope>provided</scope>
</dependency>
<dependency>
   <groupId>javax.servlet.jsp</groupId>
   <artifactId>javax.servlet.jsp-api</artifactId>
   <version>2.3.1</version>
   <scope>provided</scope>
</dependency>
<dependency>
   <groupId>jstl</groupId>
   <artifactId>jstl</artifactId>
   <version>1.2</version>
</dependency>
</dependencies>
<build>
  <plugins>
    <plugin>
       <artifactId>maven-compiler-plugin</artifactId>
       <version>3.7.0</version>
       <configuration>
           <source>1.8</source>
           <target>1.8</target>
       </configuration>
    </plugin>
  </plugins>
</build>
</project>
Why pom.xml?
A Project Object Model or POM is the fundamental unit of work in Maven. It is an XML file that contains information about the project and configuration details used by Maven to build the project such as dependencies, build directory, source directory, test source directory, plugins, etc. It contains default values for most projects. When executing the project, Maven looks for the POM in the current directory. It reads the POM, gets the needed configuration information, and then executes the goal.
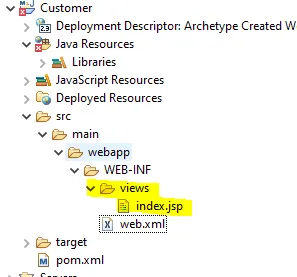
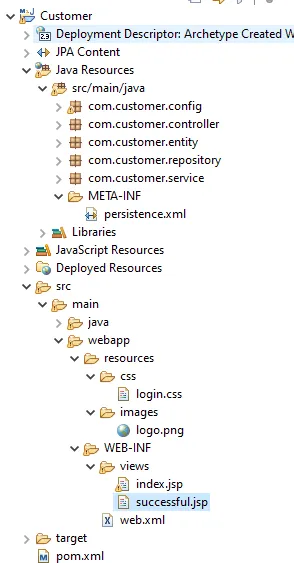
3. Edit index.jsp file.
Copy and paste the below code in the index.jsp file.
index.jsp will act as our first initial load screen — Login page.
Download index.jsp from the source code URL mentioned at the bottom of the blog.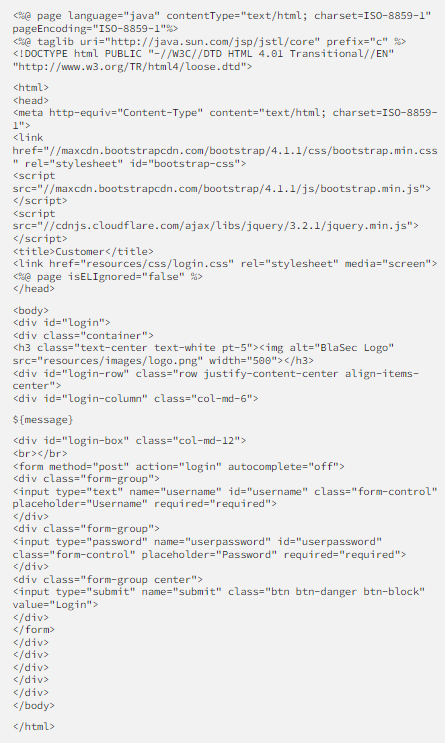
We have added the below snippet in our index.jsp file because we are using an old JSP descriptor defined by DTD in web.xml.
<%@ page isELIgnored="false" %>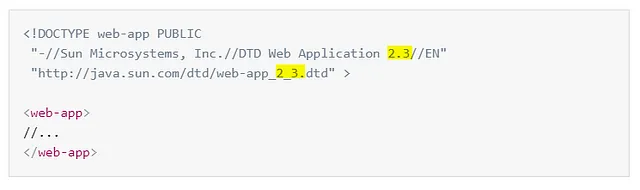
Expression Language(EL) evaluation is enabled by default if the Servlet version specified in the web deployment descriptor file (web.xml) is 2.4 or above and is ignored if the Servlet version is 2.3 or lower.
If it is lower,
${message} will print as ${message} instead of displaying the value of ‘message’.
So we manually enable EL evaluation with the above snippet.
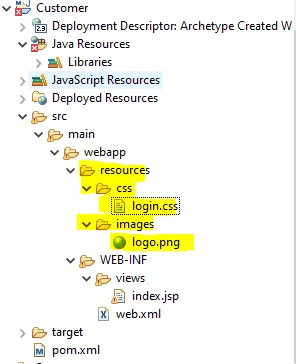
4. Copy below code to login.css and place any image you wish as logo.png
body {
margin: 0;
padding: 0;
background-color: #ffffff;
height: 100vh;
}
#login .container #login-row #login-column #login-box {
margin-top: 10px;
max-width: 600px;
height: 250px;
border: 1px solid #cc0000;
background-color: #fff4b3;
}
#login .container #login-row #login-column #login-box #login-form {
padding: 20px;
}
#login .container #login-row #login-column #login-box #login-form #register-link {
margin-top: -85px;
}
5. Let’s configure the Spring Dispatcher Servlet
To use Spring MVC for our Java web application, we need to register Spring Dispatcher Servlet upon the application’s startup.
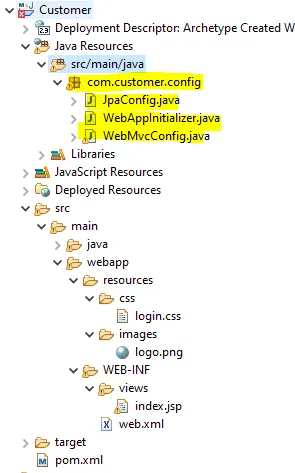
Copy and paste the below code into the WebAppInitializer.java file.
package com.customer.config;
import javax.servlet.ServletContext;
import javax.servlet.ServletException;
import javax.servlet.ServletRegistration;
import org.springframework.web.WebApplicationInitializer;
import org.springframework.web.context.support.AnnotationConfigWebApplicationContext;
import org.springframework.web.servlet.DispatcherServlet;
public class WebAppInitializer implements WebApplicationInitializer {
 @Override
 public void onStartup(ServletContext servletContext) throws  ServletException {
 AnnotationConfigWebApplicationContext appContext = new   AnnotationConfigWebApplicationContext();
 appContext.register(WebMvcConfig.class);
 ServletRegistration.Dynamic dispatcher =  servletContext.addServlet("SpringDispatcher", new  DispatcherServlet(appContext));
 dispatcher.setLoadOnStartup(1);
 dispatcher.addMapping("/");
 }
}
Configurations in Spring framework can be done either using XML-based or Java-based. Initially, there was only an XML-based concept and now Java-based configuration has also been introduced.
We use Java-based configuration as it’s simpler than XML.
The onStartup() method of this class will be automatically invoked by the servlet container when the application is loaded. The Spring Dispatcher Servlet handles all the requests via the URL mapping “/” and it looks for configuration in the WebMvcConfig class.
6. WebMvcConfig
Copy and paste the below code into the WebMvcConfig.java file.
package com.customer.config;
import org.springframework.context.annotation.Bean;
import org.springframework.context.annotation.ComponentScan;
import org.springframework.context.annotation.Configuration;
import org.springframework.web.servlet.config.annotation.EnableWebMvc;
import org.springframework.web.servlet.config.annotation.ResourceHandlerRegistry;
import org.springframework.web.servlet.config.annotation.WebMvcConfigurerAdapter;
import org.springframework.web.servlet.view.InternalResourceViewResolver;
@Configuration
@EnableWebMvc
@ComponentScan("com.customer")
public class WebMvcConfig extends WebMvcConfigurerAdapter{
@Bean(name = "viewResolver")
public InternalResourceViewResolver getViewResolver() {
InternalResourceViewResolver viewResolver = new InternalResourceViewResolver();
viewResolver.setPrefix("/WEB-INF/views/");
viewResolver.setSuffix(".jsp");
return viewResolver;
}
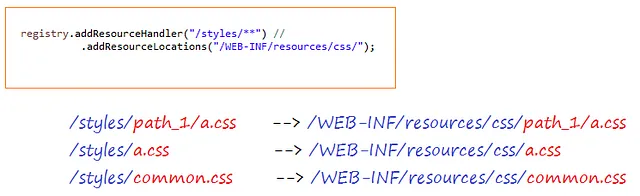
public void addResourceHandlers(ResourceHandlerRegistry registry) {
registry.addResourceHandler("/resources/**").addResourceLocations("/resources/");
}
}This class is annotated with the @Configuration annotation to tell the Spring framework that this is a configuration class. The @ComponentScan annotation tells Spring to scan for configuration classes in the com.customer package. In this class, we simply create a view resolver bean that specifies the prefix and suffix for view files (this is how a view file is taken —which is why we created a views folder under webapp/WEB-INF directory to store JSP files).
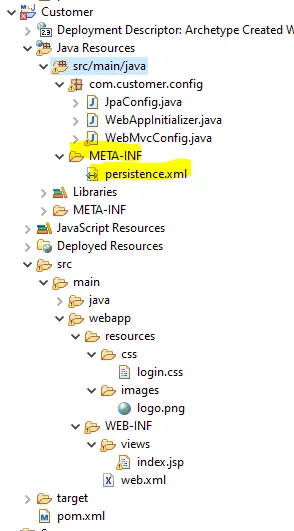
addResourceHandlers configuration is added to map the location of the resources folder which contains CSS and image files to JSP files to properly link them. Also, WebMvcConfig should extend WebMvcConfigurerAdapter to get this into effect. (Ignore this configuration if not required)
The configuration implies that ‘/resources/**’ is replaced with ‘/resources/’
In our index.jsp,
<link href="resources/css/login.css" rel="stylesheet" media="screen">
<img alt="BlaSec Logo" src="resources/images/logo.png" width="500">
It means that ‘resources/css/login.css’ is equal to ‘/resources/css/login.css’. This comes in handy when the path is different and you want to represent that path with a different name. This is how mapping done in Spring framework.
7. Let’s configure Spring Data JPA
Copy and paste the below code in the JpaConfig.java file.
Download JpaConfig.java from the source code URL mentioned at the bottom of the blog.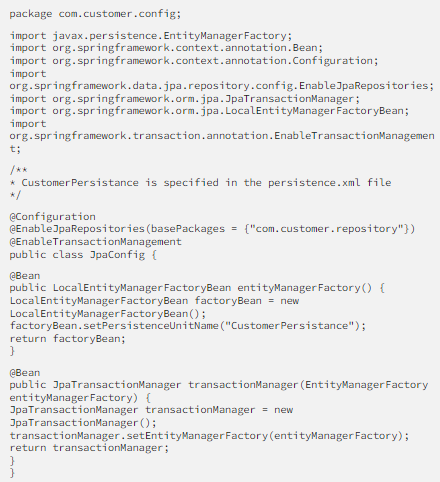
@EnableJpaRepositories: tells Spring Data JPA to look for repository classes in the specified package (com.customer.repository, which we’ll create) to inject relevant code at runtime.
@EnableTransactionManagement: tells Spring Data JPA to generate code for transaction management at runtime.
In this class, the first method creates an instance of EntityManagerFactory to manage the persistence unit ‘CustomerPersistance’ (we’ll create this persistence). The last method creates an instance of JpaTransactionManager for the EntityManagerFactory created by the first method.
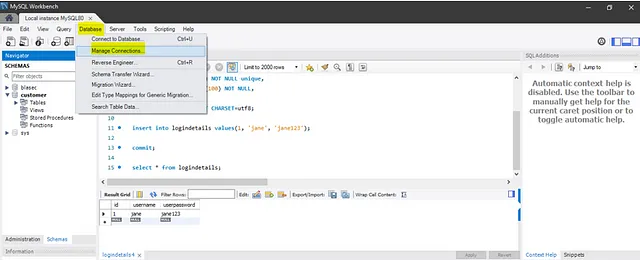
8. Open MySQL workbench
9. In Eclipse IDE
Copy and paste the below code in the persistence.xml file.
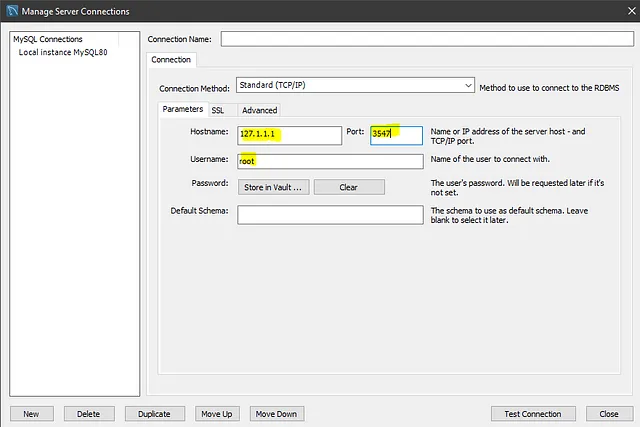
Since JPA is used, we need to specify database connection properties in the persistence.xml file instead of the hibernate.cfg.xml file. We specify database connection properties such as URL, user, password, and JDBC driver class. Note that the persistence unit name ‘CustomerPersistance’ will be used in the JpaConfig file.
<?xml version="1.0" encoding="UTF-8"?>
<persistence xmlns="http://xmlns.jcp.org/xml/ns/persistence" xmlns:xsi="http://www.w3.org/2001/XMLSchema-instance" xsi:schemaLocation="http://xmlns.jcp.org/xml/ns/persistence http://xmlns.jcp.org/xml/ns/persistence/persistence_2_1.xsd" version="2.1">
<persistence-unit name="CustomerPersistance">
<properties>
<property name="javax.persistence.jdbc.url" value="jdbc:mysql://127.1.1.1:3547/customer" />
<property name="javax.persistence.jdbc.user" value="root" />
<property name="javax.persistence.jdbc.password" value="root123" /><property name="javax.persistence.jdbc.driver" value="com.mysql.jdbc.Driver" />
<property name="hibernate.show_sql" value="true" />
<property name="hibernate.format_sql" value="true" />
</properties>
</persistence-unit>
</persistence>
10. Open MySQL workbench
Open an SQL worksheet and execute the below code.
CREATE DATABASE customer;
use customer;
CREATE TABLE logindetails (
  id int NOT NULL AUTO_INCREMENT,
  username varchar(100) NOT NULL unique,
  userpassword varchar(100) NOT NULL,
  PRIMARY KEY (id)
) ENGINE=InnoDB DEFAULT CHARSET=utf8;
We’ll insert one login detail manually to perform the login flow. (Retrieve(CRUD))
insert into logindetails values(1, 'jane', 'jane123');
commit;
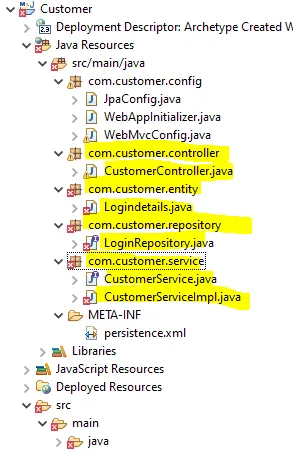
select * from logindetails;11. Class ‘Logindetails’ to map with the table ‘logindetails’ in the database ‘customer’.
package com.customer.entity;
import javax.persistence.Entity;
import javax.persistence.GeneratedValue;
import javax.persistence.GenerationType;
import javax.persistence.Id;
@Entity
public class Logindetails {
@Id
@GeneratedValue(strategy = GenerationType.IDENTITY)
private Long id;
private String username;
private String userpassword;
public Logindetails() {}
public Logindetails(String username, String userpassword) {
this.username = username;
this.userpassword = userpassword;
}
public Long getId() {
return id;
}
public void setId(Long id) {
this.id = id;
}
public String getUsername() {
return username;
}
public void setUsername(String username) {
this.username = username;
}
public String getUserpassword() {
return userpassword;
}
public void setUserpassword(String userpassword) {
this.userpassword = userpassword;
}
public int hashCode() {
final int prime = 31;
int result = 1;
result = prime * result + ((id == null) ? 0 : id.hashCode());
result = prime * result + ((username == null) ? 0 : username.hashCode());
result = prime * result + ((userpassword == null) ? 0 : userpassword.hashCode());
return result;
}
public boolean equals(Object obj) {
if (this == obj)
return true;
if (obj == null)
return false;
if (getClass() != obj.getClass())
return false;
Logindetails other = (Logindetails) obj;
if (id == null) {
if (other.id != null)
return false;
} else if (!id.equals(other.id))
return false;
if (username == null) {
if (other.username != null)
return false;
} else if (!username.equals(other.username))
return false;
if (userpassword == null) {
if (other.userpassword != null)
return false;
} else if (!userpassword.equals(other.userpassword))
return false;
return true;
}
public String toString() {
StringBuilder builder = new StringBuilder();
builder.append("Logindetails [id=");
builder.append(id);
builder.append(", username=");
builder.append(username);
builder.append(", userpassword=");
builder.append(userpassword);
builder.append("]");
return builder.toString();
}
}
As you can see, we use the annotation @Entity to map this class to the table logindetails (the class has the same name as the table). All the class field names are also identical to the table’s ones. The field id is annotated with @Id and @GeneratedValue annotations to indicate that this field is the primary key and its value is auto-generated.
12. The CustomerController class handles all requests from the clients.
package com.customer.controller;import org.springframework.beans.factory.annotation.Autowired;
import org.springframework.stereotype.Controller;
import org.springframework.web.bind.annotation.RequestMapping;
import org.springframework.web.bind.annotation.RequestMethod;
import org.springframework.web.bind.annotation.RequestParam;
import org.springframework.web.servlet.ModelAndView;
import com.customer.entity.Logindetails;
import com.customer.service.CustomerService;@Controller
public class CustomerController {@Autowired
private CustomerService customerService;/**
* Initial load - Login page
*/@RequestMapping("/")
public ModelAndView home() {
ModelAndView modelAndView = new ModelAndView("index");
return modelAndView;
}/**
* Validate login credentials and if found, redirects to successful page, else, login page.
*/
@RequestMapping(value = "/login", method = RequestMethod.POST)
public ModelAndView validateUser(@RequestParam String username, @RequestParam String userpassword) {
ModelAndView modelAndView = null;
Logindetails result = customerService.validateUser(username, userpassword);
if (result != null) {
modelAndView = new ModelAndView("successful");
return modelAndView;
} else {
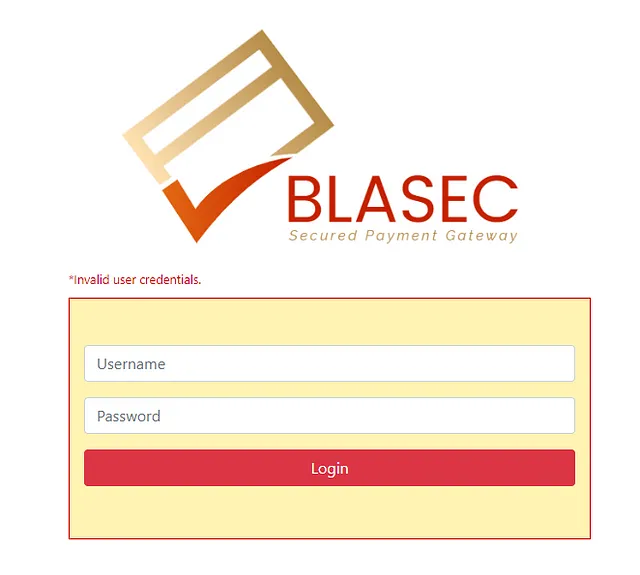
String message = "<small style=\"color: #cc0000;\">*Invalid user credentials.</small>";
modelAndView = new ModelAndView("index");
modelAndView.addObject("message", message);
}
return modelAndView;
}
}This is a typical Spring MVC controller class, which is annotated with the @Controller annotation. It’s used to mark a class as a web request handler. An instance of CustomerService is injected into this class using the @Autowired annotation. The auto-wiring feature of the spring framework enables you to inject the object dependency. It internally uses a setter or constructor injection (these are different types of dependency injections).
First, @RequestMapping(“/”) is looked upon and is executed initially. Hence. index.jsp page loads first. In index.jsp, we specified an action in the form tag that needs to be executed when the login button is clicked.
action="login"It checks for @RequestMapping(value = “/login”) and that method gets executed, which is the login validation(retrieves data from the database and verifies). If found, a ModelAndView is created with its parameter as ‘successful’ — which is the next JSP page to be loaded if login is successful.
Create a successful.jsp page inside ‘views’ and place the below code in it.
<%@ page language="java" contentType="text/html; charset=ISO-8859-1" pageEncoding="ISO-8859-1"%>
<%@ taglib uri="http://java.sun.com/jsp/jstl/core" prefix="c" %>
<!DOCTYPE html PUBLIC "-//W3C//DTD HTML 4.01 Transitional//EN" "http://www.w3.org/TR/html4/loose.dtd">
<html>
<head>
<meta http-equiv="Content-Type" content="text/html; charset=ISO-8859-1">
<title>Customer</title>
</head>
<body>
<div align="center">
<h2>Login Successful</h2>
</div>
</body>
</html>
Else, index.jsp page is loaded with an error message added as an object and in index.jsp, the below snippet is used to display it.
${message}If the message needs to be displayed in a format, we compose it in HTML code.
String message = "<small style=\"color: #cc0000;\">*Invalid user credentials.</small>";13. The CustomerService class will act as an interface.
package com.customer.service;
import org.springframework.stereotype.Service;
import com.customer.entity.Logindetails;
@Service
public interface CustomerService {
public Logindetails validateUser(String username, String userpassword);
}@Service annotation is used in the service layer to annotate classes that perform service tasks, often we don’t use it in many cases but using this annotation to represent is a best practice. It is used to mark the class as a service provider.
An interface in the Java programming language is an abstract type that is used to specify a behavior that classes must implement. A class implements an interface, thereby inheriting the abstract methods of the interface. Interfaces are declared using the interface keyword, and may only contain method signature and constant declarations.
14. The CustomerServiceImpl class will implement the interface.
package com.customer.service;
import org.springframework.beans.factory.annotation.Autowired;
import org.springframework.stereotype.Component;
import org.springframework.transaction.annotation.Transactional;
import com.customer.entity.Logindetails;
import com.customer.repository.LoginRepository;
@Component("customerService")
@Transactional
public class CustomerServiceImpl implements CustomerService{
@Autowired
private LoginRepository loginRepository;
public Logindetails validateUser(String username, String userpassword) {
return loginRepository.validateUser(username, userpassword);
}
}
CustomerServiceImpl implements CustomerService, thereby inheriting the abstract methods of the interface and giving a method body.
The @Component annotation marks the Java class as a bean or component so that the component-scanning mechanism of Spring can add it to the application context. It also means that the Spring framework will auto-detect these classes for dependency injection when classpath scanning is used.
@Transactional describes a transaction attribute on an individual method or a class. At the class level, this annotation applies as a default to all methods of the declaring class and its subclasses. On whichever method you declare @Transactional the boundary of the transaction starts and the boundary ends when the method completes. If you are using a JPA call then all commits will be in this transaction boundary. Let’s say you are saving entity1, entity2, and entity3. Now while saving entity3 an exception occurs, then as entity1 and entity2 come in the same transaction, entity1 and entity2 will roll back with entity3.
When Spring loads bean definitions, and has been configured to look for @Transactional annotations, it will create proxy objects around your actual bean. These proxy objects are instances of classes that are auto-generated at runtime. The default behavior of these proxy objects when a method is invoked is just to invoke the same method on the “target” bean (i.e. your bean).
However, the proxies can also be supplied with interceptors, and when present these interceptors will be invoked by the proxy before it invokes your target bean’s method. For target beans annotated with @Transactional, Spring will create a TransactionInterceptor, and pass it to the generated proxy object. So when you call the method from client code, you’re calling the method on the proxy object, which first invokes the TransactionInterceptor (which begins a transaction), which in turn invokes the method on your target bean. When the invocation finishes, the TransactionInterceptor commits/rolls back the transaction. It’s transparent to the client code.
Basically, @Transactional is a big topic.
15. LoginRepository interface extends the JpaRepository interface defined by Spring Data JPA.
As with Spring Data JPA, you don’t have to write any DAO code. Just declare an interface that extends the JpaRepository interface, which defines CRUD methods like save(), findAll(), findById(), deleteById(), etc. At runtime, Spring Data JPA automatically generates the implementation code. Note that we must specify the type of the model class and type of the primary key field when extending the JpaRepository interface:- JpaRepository<Logindetails, Long>
package com.customer.repository;
import org.springframework.data.jpa.repository.JpaRepository;
import org.springframework.data.jpa.repository.Query;
import org.springframework.data.repository.query.Param;
import org.springframework.stereotype.Repository;
import com.customer.entity.Logindetails;
/**
* Code Repository Interface:
*/
@Repository("loginRepository")
public interface LoginRepository extends JpaRepository<Logindetails, Long> {
@Query(value = "SELECT c FROM Logindetails c WHERE c.username = :username" + " AND c.userpassword = :userpassword")
public Logindetails validateUser(@Param("username") String username, @Param("userpassword") String userpassword);
}
@Repository annotation is used to indicate that the class provides the mechanism for storage, retrieval, search, update, and delete operations on objects. It is indeed not necessary to put the @Repository annotation on interfaces that extend JpaRepository ; Spring recognizes the repositories by the fact that they extend one of the predefined Repository interfaces. But it is a standard followed.
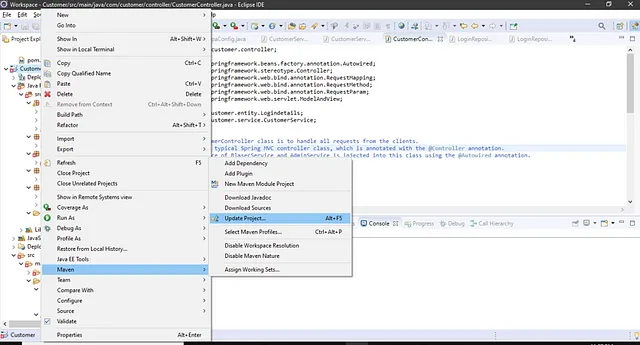
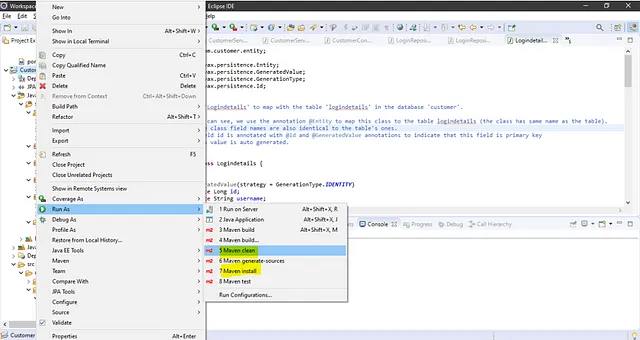
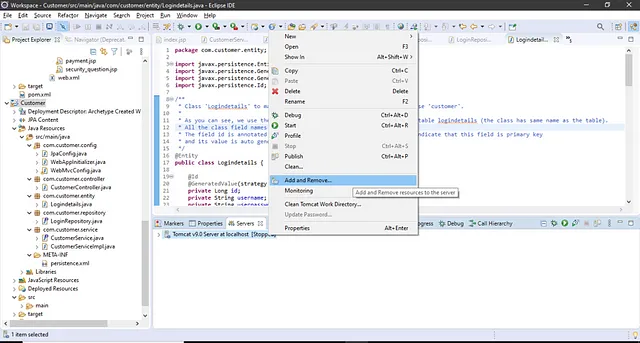
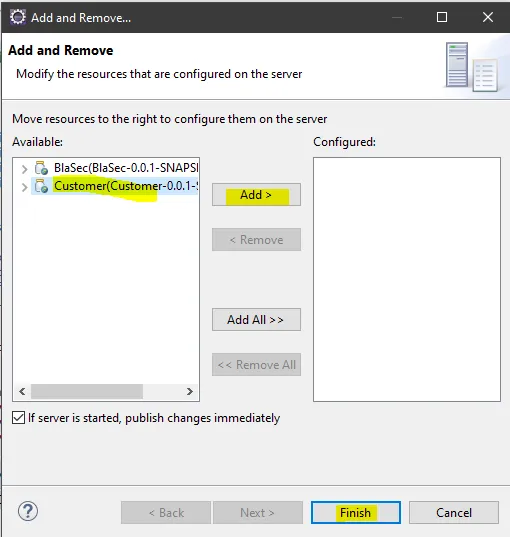
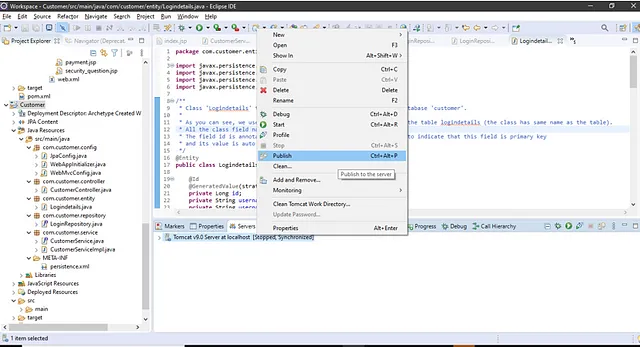
16. Now let’s build our project.
Follow the below steps:

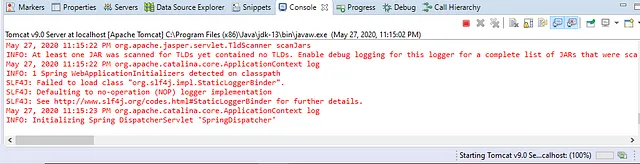

17. Go to your favorite browser and hit this link. (Remember to use your port)
http://localhost:8088/Customer/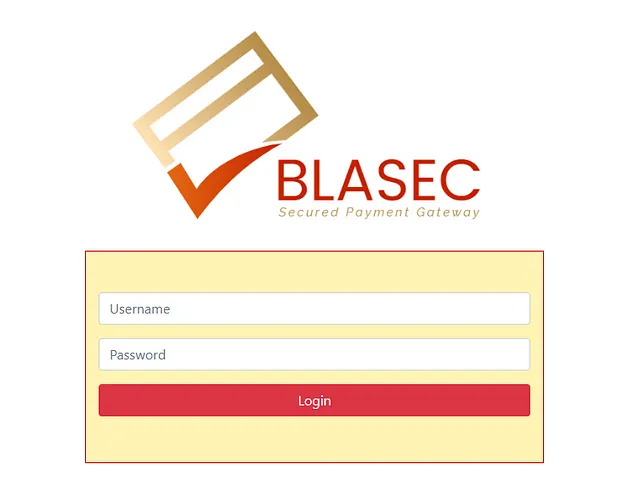
Provide username and password. If it’s correct, Login Successful

Else, retype.
Thus, we come to an end of the READ operation 😊
Thank you for reading! I hope you’re able to understand and proceed with development with this explanation and please share to help others too. 😊

Click on the below link to continue coding (CREATE, UPDATE, and DELETE)— Part 3:
How to build a Java web application using Spring framework? Part 3/3 (Coding)
Well, there are a lot of areas for improvement in this project and, for any new suggestions or comments, I’m all ears.
Download project from: https://github.com/sharuroy16/customer
Project developed using this methodology: https://github.com/sharuroy16/blasec